
This outlines how customers and carriers can ensure they're receiving emails from C4 by whitelisting the Cargo Chief Domains in Gmail and Outlook.
For Gmail:
1. Open Gmail Settings
-
Log into your Gmail account.
-
Click on the gear icon in the top-right corner and select See all settings.
2. Navigate to Filters and Blocked Addresses
-
In the Settings menu, go to the Filters and Blocked Addresses tab.
3. Create a New Filter
-
Scroll down and click Create a new filter.
4. Specify the Domains to Whitelist
-
In the From field, enter the domains you want to whitelist. You can use:
@parse.cargochief.com
@cargochief.com -
This ensures emails from these domains are filtered correctly.
5. Apply Filter Settings
-
Click Create filter with this search.
-
On the next screen, check Never send it to Spam.
6. Save Your Filter
-
Click Create filter to finalize the process.
Steps to Adjust Approved Senders/Allowlist in Google Workspace
1. Log into Google Admin Console
-
Go to admin.google.com and sign in with your admin account.
2. Navigate to Gmail Settings
-
In the Admin Console, go to Apps > Google Workspace > Gmail > Spam, Phishing, and Malware.
3. Find the Allowlist Setting
-
Scroll down to the section labeled Spam.
-
Locate Allowlist under the Email Allowlist section.
4. Add Domains to the Allowlist
-
Click on Configure (or Edit if the setting is already configured).
-
Enter the domains you want to allow. For example:
parse.cargochief.com
cargochief.com -
Save your changes.
5. Optional: Adjust Default Spam Filter Settings
-
Go back to the Spam, Phishing, and Malware section.
-
Look for Bypass spam filters for messages received from addresses or domains within these senders.
-
Add the same domains to ensure emails bypass spam filters.
6. Save Changes
-
Confirm and save your configuration.
-
Note: Changes may take up to 24 hours to propagate across your organization.
--
For Outlook/Hotmail:
Individual Inbox Allow list
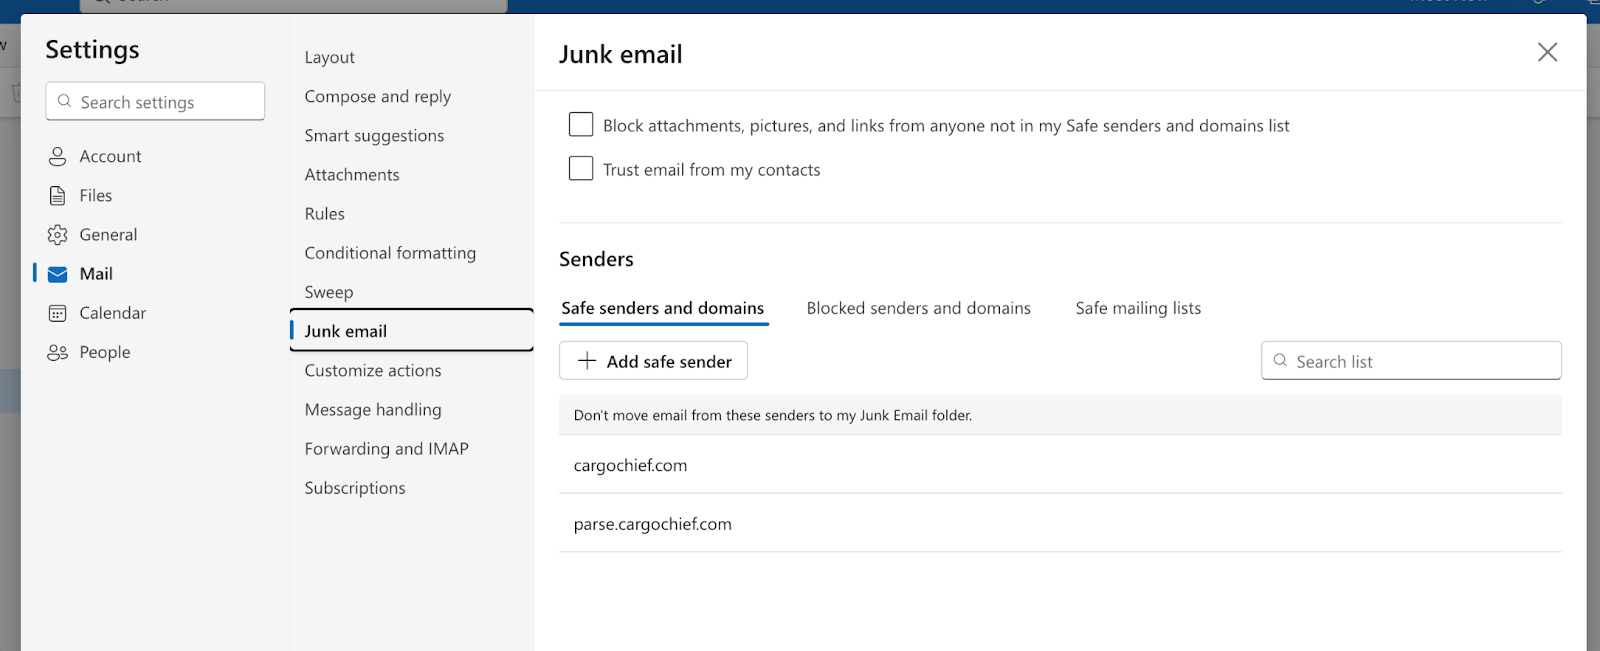
- Log in to your Outlook account
- Go to Settings > Mail > Junk Email
- In the Junk Email go to Sender and select Safe senders and domains
- Add cargochief.com and parse.cargochief.com as safe senders.
To whitelist a domain in Outlook for a group inbox, follow these steps:
Step 1: Log in to Outlook Online (Admin Account Needed)
- Open your browser and go to Microsoft 365 Admin Center.
- Sign in with admin credentials.
Step 2: Access Exchange Admin Center (EAC)
- In the admin center, go to Admin Centers > Exchange.
- Once in EAC, click Mail Flow from the left menu.
- Select the Rules tab.
Step 3: Create a Whitelisting Rule
- Click the + icon to add a new rule, and select Create a new rule.
- Name the rule (e.g., "Whitelist Cargo Chief Domain").
- Under Apply this rule if..., select The sender’s domain is and specify the domain you want to whitelist (@parse.cargochief.com) and @cargochief.com.
- Under Do the following..., choose Modify the message properties > Set the spam confidence level (SCL), and set it to -1 (bypass spam filtering).
Step 4: Review and Save the Rule
- Review the rule settings to ensure the correct domain is listed.
- Click Save to activate the rule.
Microsoft add recipients to safe senders page: